Session 5: LCD and KeyPad#
Goal#

Bonus point#
enter password
type
*instead of actual characterD: clear the inputE: submit your password
LCD#
LCD is used to write parameters and status.
We have a 16x2 LCD (16 columns and 2 rows).
It has 16-pins.
VSS |
VCC |
VEE |
|---|---|---|
Ground |
5V+ |
Contrast Control |
RS |
RW |
E |
|---|---|---|
Register select |
Read / Write |
Enable |
D0 |
D1 |
D2 |
D3 |
D4 |
D5 |
D6 |
D7 |
|---|---|---|---|---|---|---|---|
Data pin 0 |
Data pin 1 |
Data pin 2 |
Data pin 3 |
Data pin 4 |
Data pin 5 |
Data pin 6 |
Data pin 7 |
LED+ |
LED- |
|---|---|
LED 5V+ |
LED Ground |

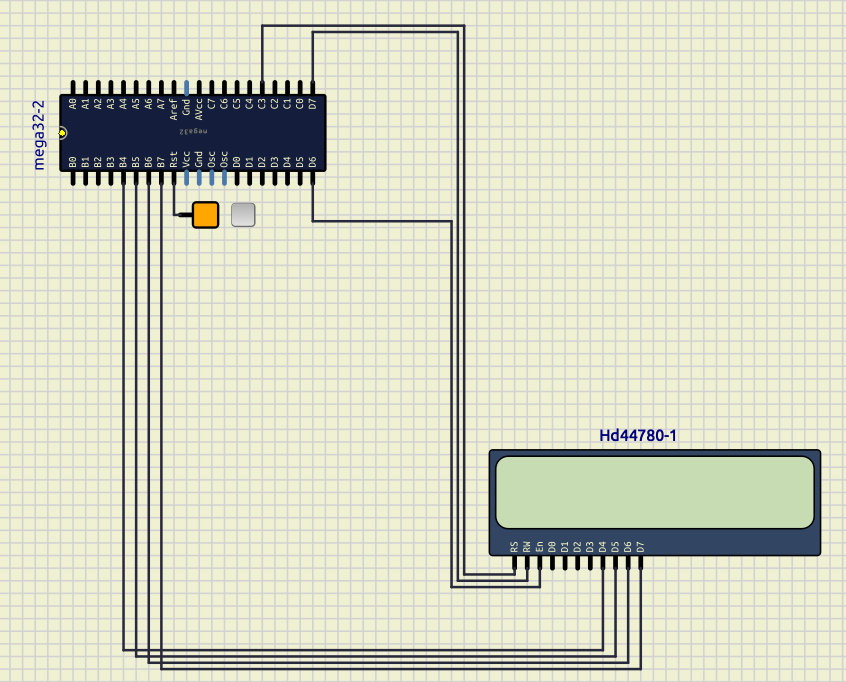
Connect LCD on SimulIDE#
In SimulIDE we can select an LCD from /outputs/displays/HD44780 and connect it to the ATmega32.
We connect the pins like this:
RS PC3
RW PD7
EN PD6
D4 PB4
D5 PB5
D6 PB6
D7 PB7
So the result would be like the image below:
LCD library and header file#
For LCD library, We have a directory called lcd_library which have two files:
To use them in our project we shoud copy the whole directory of lcd_library
to the lib directory of our PlatformIO project.
Then we are going to be able to import it using the code below:
#include <lcd_library.h>
This library has 6 functions, that we are going to explain about them more.
lcd_init#
initializes our LCD.
Sets DDRs and PORTs required for the LCD to function.
Synopsis:
void lcd_init();
Example:
lcd_init();
lcd_gotoxy#
Goes to a position on LCD.
Synopsis:
void lcd_gotoxy(unsigned char row, unsigned char col)
Arguments:
row: row positioncol: column position
Example:
lcd_gotoxy(1, 5);
lcd_putchar#
Puts a charachter in a current position of the LCD.
Synopsis:
void lcd_putchar(unsigned char data);
Arguments:
data: Character that we want to write on theLCD
Example:
lcd_putchar('p');
lcd_puts#
Puts a string in a current position of the LCD.
If it exceeds, goes back to the 0 column.
Synopsis:
void lcd_puts(const char *str);
Arguments:
str: String that we want to write on theLCD
Example:
lcd_puts("hello");
lcd_clear#
Clears the LCD
Synopsis:
void lcd_clear();
Example:
lcd_clear();
lcd_commad#
Sends a command to the LCD.
Synopsis:
void lcd_command(unsigned char cmd);
Arguments:
cmd: Command that we want to send to theLCD
Example:
// to clear the display:
lcd_command(0x01);
PIN#
We use PIN variable to read data of a pin.
For example:
char x = PINA;
Keypad#

As you can see on the image above, the way that
each key is connected to ATmega32 is shown.
col0 |
col1 |
col2 |
col3 |
row0 |
row1 |
row2 |
row3 |
|---|---|---|---|---|---|---|---|
PA.0 |
PA.1 |
PA.2 |
PA.3 |
PA.4 |
PA.5 |
PA.6 |
PA.7 |
Important
We put 1 in all the pins.
Detect one key (row0, col0)#
In order to detect which key is pressed we start with one key.
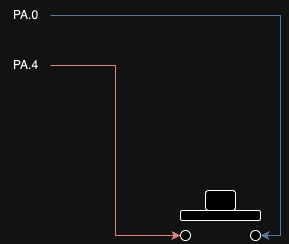
As you can see on the image above
if I put 0 in PORTA.4:
If the key is pressed:
PINA.0= 0If the key is not pressed:
PINA.0= 1
The simulation would be like below:

Detect a row of keys (row0)#
Now we try to detect a row of keys.
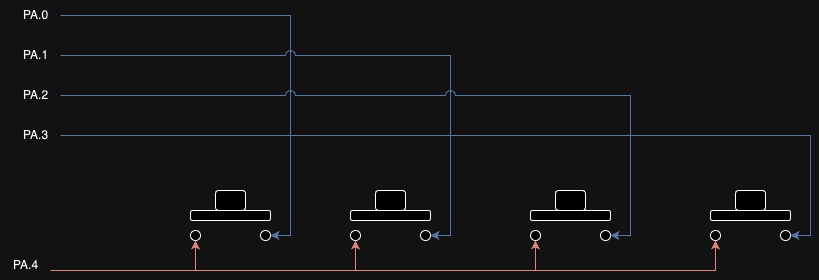
As you can see on the image above
if I put 0 in PORTA.4:
If the key in
col0is pressed:PINA.0= 0If the key in
col1is pressed:PINA.1= 0If the key in
col2is pressed:PINA.2= 0If the key in
col3is pressed:PINA.3= 0
The simulation would be like below:

Detect all keys#
To detect all keys we can run a for on
PORTA.4 to PORTA.7